Find Similar Objects
Parent page: Sch Dialogs
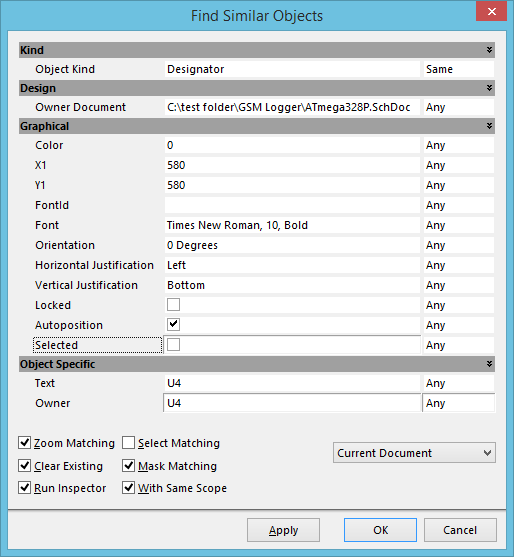
The Find Similar Objects dialog.
Summary
This dialog allows the designer to set up search criteria for the Find Similar Objects (FSO) process. This process uses the attributes of a target object as a reference for finding several other objects with similar characteristics.
Access
From the Schematic Editor, or Schematic Library Editor, the dialog can be accessed in the following ways:
- Use the Tools | Find and Replace |
 » Find Similar Objects command, from the main menus, then click on an object in the workspace. This object will be used as the template for finding similar objects.
 - Press Shift+F, then click on an object in the workspace to use as the template.
- Right-click over the required template object in the workspace, then choose the Find Similar Objects command from the context menu.
Options/Controls
The dialog is divided into two primary sections; the upper section consists of a grid that lists the attributes of the template (or reference) object, and the lower section consists of a group of check boxes that define what will happen once the Apply or OK button is clicked.
Attribute Grid
The grid of attributes for the reference object is divided into three columns:
- Left Column - lists the names of all the attributes of the reference object.
- Center Column - lists the value of those attributes taken from the reference object.
- Right Column - provides a drop-down list of options used for specifying how the associated attribute should be used to find similar objects. The options are:
- Any - find similar objects with any value for this attribute.
- Same - find similar objects with the same value set for this attribute, as that of the reference object.
- Different - find similar objects with a different value set for this attribute, to that of the reference object.
Scoping and Highlighting Options
The dialog provides the following highlighting options:
- Zoom Matching - enable this option to have all objects matching the search criteria zoomed and centered (where possible) in the workspace.
- Select Matching - enable this option to have all objects matching the search criteria selected in the workspace.
- Clear Existing - enable this option to clear any existing selection or editing mask before performing the search. Disable this option if doing successive Find Similar Objects searches, and it is desirable for the results to accumulate.
- Mask Matching - enable this option to have those objects matching the search criteria appear fully visible in the workspace, with all non-matching objects becoming dimmed. With this option applied, non-matching objects will be unavailable for selection and editing.
- Run Inspector - enable this option to display the editor's Inspector panel after running a search using the OK button. For this option to produce meaningful results, it will be necessary to have the Select Matching option set, since the Inspector panel will only show attributes from currently selected objects.
- With Same Scope - this option becomes available when the Run Inspector option is enabled. Enabling this option will set the scope for the Inspector panel to be the same as that for the Find Similar Objects dialog.
- Scope - this field allows you to determine the scope of the filtering. The options available depend on the editor you are in:
- Schematic Editor - choose to apply the filtering to the Current Document, or all Open Documents in the active project.
- Schematic Library Editor - choose to apply the filtering to the Current Component, or All Components in the active library.
Notes
- Control the masking level using the View | Schematic | Mask Level slider control.
- Clear applied masking in the workspace using the View | Schematic | button.