Page Setup
Contents
Other Related Resources
Parent page: WorkspaceManager Dialogs
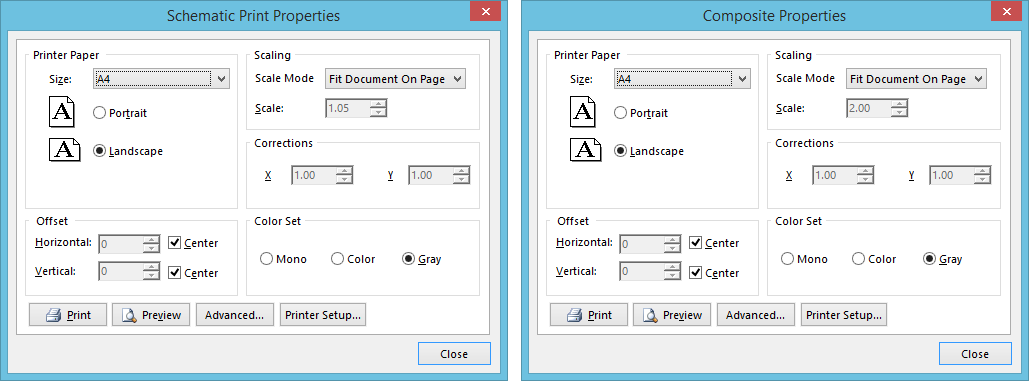
Two incarnations of the Page Setup dialog.
Summary
This dialog allows the designer to configure how the software outputs the specified printout to the chosen printer, in terms of paper, scaling and color settings.
Access
The dialog can be accessed in the following ways:
- From the Schematic and PCB Editors, using the Outputs | Documentation |
 » Page Setup command, from the main menus.
 - Right-clicking on a document's entry in the Projects panel, and choosing the Page Setup command from the context menu (where available).
- Right-clicking in the Print Preview dialog, and choosing the Page Setup command from the context menu.
- Selecting an entry on the Default Prints tab of the Project Options dialog, and clicking the Page Setup button.
Options/Controls
Printer Paper
- Size - use this field to choose the size of paper you are printing on. The field's drop-down populates with all paper sizes supported by the printing device chosen in the Printer Configuration dialog.
- Orientation - use this control to determine the orientation of the printed output on the page, either Portrait or Landscape.
Scaling
- Scale Mode - use this field to determine the mode of scaling employed. Choose from either Fit Document On Page, or Scaled Print.
- Scale - this field becomes available when the Scale Mode is set to Scaled Print. Use it to define how much the document is scaled. Entering a value greater than 1 will essentially enlarge the print (a zoomed-in effect), while entering a vlaue less than 1 will shrink it (a zoomed-out effect).
Corrections
- X/Y - these fields become available when the Scale Mode is set to Scaled Print. Use them to adjust the printout in the horizontal and vertical planes respectively, for scaling errors in the printer.
Offset
- Horizontal - use this field to manually adjust the position of the printed content on the page, in the horizontal plane. Enter a positive value to shift the printed content to the right on the page, or a negative value to shift it left. If the field is set to zero, the minimum horizontal left-hand margin required by the printer is used. Enable the Center option to automatically position the printed content so that it is centered horizontally on the page.
- Vertical - use this field to manually adjust the position of the printed content on the page, in the vertical plane. Enter a positive value to shift the printed content upward on the page, or a negative value to shift it downward. If the field is set to zero, the minimum vertical bottom margin required by the printer is used. Enable the Center option to automatically position the printed content so that it is centered vertically on the page.
Color Set
Use the options available in this region of the dialog to choose which color set you want to use for the printed output. Available color sets are:
- Mono - choose this option to use the monochrome color set, whereby the content will be printed in black and white only.
- Color - choose this option to use the full color set, whereby the content will be printed using all colors available to the nominated printing device, as required.
- Gray - choose this option to use the gray scale color set, whereby the content will be printed in shades of gray only.
Additional Buttons
- Print - click this button to print the required content. The Printer Configuration dialog will appear, with which to confirmwhat is to be printed, and to which printing device.
- Preview - click this button to access the Print Preview dialog, with the page(s) to be printed loaded ready, and in accordance with the defined page setup, and printer configuration. use the previewer to make sure the resulting print looks exactly as you need it to, prior to generating the actual print(s).
- Advanced - click this button to access an additional properties dialog, with printing options in relation to content included in the print. The actual dialog accessed, and the options it provides, depends on the document type from which you are trying to print:
- Schematic - accesses the Schematic Print Properties dialog.
- PCB/PCBLib - accesses the PCB Printout Properties dialog.
- PCB 3D Print - accesses the PCB 3D Print Settings dialog.
- Printer Setup - click this button to access the Printer Configuration dialog, from where you can define what is printed, and to which printing device it is sent.